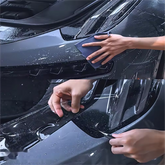
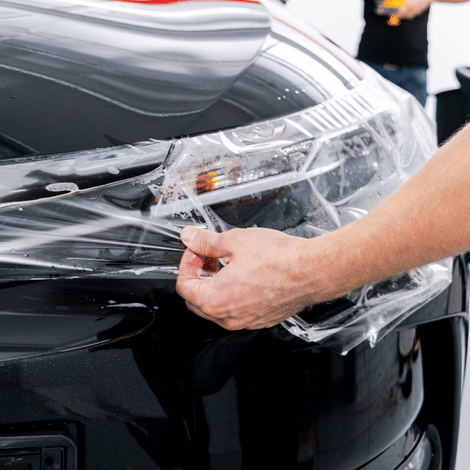
Ultimate Guide to PPF Tools for Perfect Paint Protection Film Installation
In the area of vehicle detailing and protection, paint protection film (PPF) has become an important product for preserving the look and health of automotive exteriors. There are many techniques involved in putting on PPF that require certain tools to be used. Hence, this complete guide seeks to enlighten readers about the different types of equipment needed for a perfect installation of PPF by explaining what they do, why you should use them, and how they can be used best. Whether you’re an experienced installer or just someone who wants their car’s finish to last longer, knowing these basics will give you more knowledge so that when faced with installing it yourself or paying someone else thousands in labor charges – at least not feeling like everything is going over your head should something go wrong during the process.
What Are Essential PPF Tools You Need?

Basic PPF Tool Kit for Beginners
A beginner entering into Paint Protection Film (PPF) installation should have the following crucial tools in his or her basic toolkit:
- Precision knife: This tool is used to make fine cuts in the film, depending on the shape of the vehicle.
- Squeegee: Used to smoothen out films and remove any air bubbles that might be present.
- Hot air gun: This helps conform to the vehicle’s shape, ensuring better adhesion on all parts.
- Spray bottle: A recommended slip solution for easier adjustments during the setup process.
- Microfiber towels: These keep surfaces clean and reduce the chances of scratching while being handled.
- Tape: It can help mark edges and temporarily hold down the film.
With a few essential tools, beginners can be guaranteed accurate and efficient PPF installations.
Specialty Tools: PPF Squeegee and More
Some specialty tools may significantly improve the installation process and enhance the application quality, apart from the basic PPF toolkit.
- PPF Squeegee: To prevent air bubbles and ensure film adhesion throughout not easy-to-reach places or curves, a special squeegee with notches is used. This also guarantees a smooth finish.
- Application Fluid: It is necessary for lubricating the film during its application so that it can be repositioned more easily.
- Debris Removal Tool: Before applying PPF to vehicles’ surfaces, this tool ensures that all dust particles or other contaminants have been removed; this helps maintain the adhesion strength and durability of the Paint Protection Film.
- Heat Resistance Gloves: To protect against burns caused by heat guns while installing them on cars’ bodies these gloves are worn by technicians working with such devices – they shield hands from high temperatures and ensure their safety during work.
By using these specialized instruments, not only will fitting become easier, but also flawless surface finish can be achieved.
Choosing the Right Tool for Your PPF Installation
Ensuring the successful installation of Paint Protection Film (PPF) requires careful selection of tools. Here are three key things to consider :
- Quality is More Important than Quantity: Experts recommend buying high-quality tools that have been specifically designed for use with automotive films. Although many basic tools can be substituted in some situations, those made for PPF – such as a squeegee with special notches or an application liquid – could speed up work and give it a better look at the end.
- Understanding Applications: Each tool has its own purpose during application; for instance, a notched squeegee is essential for getting around tight bends while applying fluid makes repositioning easier. A good knowledge of these will help prepare well and execute properly during installation.
- Maintenance and Preparation: Tools should be kept clean and checked before usage to avoid problems when installing them later. This involves cleaning regularly and inspecting items like squeegees to prevent contamination, which may affect the adhesion of PPF.
Remembering these things can enable hobbyists or professionals to achieve success in installing PPF.
How to Use a PPF Squeegee for Smooth Installations?

Different Hardness Levels of PPF Squeegee
PPF squeegees are available in different levels of hardness that affect their performance when being used.
- Soft Squeegees: They are bendy and recommended for fragile surfaces as well as tight corners because they enable the installer to maneuver around the film gently without tearing it apart.
- Medium Hardness Squeegees: These give a good balance between flexibility and control hence can be used for most PPF applications where smooth finish on compound curves is required.
- Hard Squeegees: They are stiff thus applicable on flat areas only; this allows even pressure distribution during the application process which results into efficient removal of water. However, care should be taken not to overstretch these tools while working along curved edges as too much force might damage the protective coatings.
Choosing the right level of hardness increases accuracy and ensures best outcomes throughout PPF installation.
Techniques for Using a PPF Squeegee Smoothly
To make use of a PPF squeegee for a perfect installation, here are some techniques:
- Angle Adjustment: Keep the angle at 30 to 45 degrees consistent as you squeegee. This will help in even distribution of pressure over the film and reduce chances of air bubbles or other imperfections.
- Sequential Movement: Start from the middle of the film and move outwards systematically. Doing so ensures that any trapped air or excess moisture is pushed toward the edges, thus preventing creasing.
- Light Pressure: Use light but uniform pressure while working across with your squeegee on top of the protective film. Too much force can either lift it up from its substrate especially in delicate areas.
- Wet Application: Where applicable, apply soapy water solution as lubricant. This makes repositioning during installation easier and also prevents scratching when squeezing against the surface.
- Frequent Checks: Lift the film’s edge frequently to check whether there are wrinkles or air bubbles that need adjustment before adhesive sets. Attending promptly to these problems contributes towards achieving a smooth finish.
These methods can be used together by those using PPFs so that they may achieve better results with their installations making them look more professional.
Common Mistakes and How to Avoid Them
While installing paint protection film (PPF), many people fail to understand common mistakes that can ruin their work. Realization of these pitfalls is essential for a better installation process.
- Insufficient Surface Preparation: Not cleaning the surface enough before applying PPF may cause dirt or debris to get stuck beneath it, causing blemishes. To prevent this, ensure thorough cleaning and drying by removing any contaminants that may interfere with adhesion.
- Neglecting Temperature Considerations: Working with inappropriate temperature conditions during application can compromise performance and adhesion of the film used as paint protector. Ideally, installation should be done at temperatures between 60°F and 80°F (15°C to 27°C). Always check what the manufacturer recommends about this before you start applying it.
- Rushing the Process: Many times, when people are doing meticulous installations for PPFs, they tend to underestimate the time required. Hurrying through things might make one make errors like misaligning or not exerting enough pressure when squeegeeing is being done. Take more than enough time needed in every stage so that accuracy can be achieved throughout, leading to an improved final product quality.
Knowing these mistakes could help installers avoid them thus enhancing their results achievement towards professional finish standards.
How to Properly Prep Your Vehicle for PPF Installation?

Tools You Need for Vehicle Prep
- High-Quality Car Wash Soap: Use a soap with an appropriate pH level for taking out pollutants without causing damage to paint.
- Microfiber Towels: Soft, lint-free towels are needful in drying the vehicle without scratching it.
- Clay Bar: This is a critical tool for removing embedded contaminants from the paint surface.
- Isopropyl Alcohol (IPA): It will be very important to use this chemical while wiping off surfaces so as to ensure that no oils or residues remain on them.
- Spray Bottle: For mixing solutions and lubricating during the process of the clay bar.
- Squeegee: This can help you smoothen water and make PPF adhere well.
- Heat Gun: Useful for adjusting the shape of the film and ensuring its best application, especially in cooler climates.
- Masking Tape: The best one is great for marking out areas and safeguarding edges during installation.
Gathering these tools before installing makes the preparation phase more effective and efficient in applying paint protection film.
Steps for Cleaning and Prepping Your Vehicle
- Wash the Car: The first step is to wash the car very well using top-quality car wash soap that is pH balanced. This will help in removing dirt, grime and contaminants from the surface which might hinder adhesion of PP.
- Dry Surface: Dry off all water gently with microfiber towels ensuring no water spots or residue remain as they may affect film application later on.
- Clay Bar Treatment: Use a clay bar to get rid of embedded contaminants by working in sections while spraying lubricating spray from your bottle for smooth movement and better cleaning action.
- Surface Wipe With IPA: After laying down your wrap wipe down surfaces with clean microfiber towel soaked in isopropyl alcohol (IPA). Doing this removes oils, waxes and residues left behind which can prevent proper bonding between paint and film thus giving a clean base for sticking.
- Masking: Use masking tape to outline areas where PPF will be installed so that edges are protected while maintaining clear lines during application process.
- Inspect For Imperfections: Check over the vehicle one more time before applying ppf for any preparation mistakes because these will show up under wraps.
If you follow these steps closely, then you should have no problems with your paint protection film sticking on well.
Importance of Using the Right Slip Solution
For the best outcomes, it is important that one uses the right slip solution when applying paint protection film (PPF). This lubricant helps in positioning and moving the film during installation by acting as a lubricant. Before bonding to the surface of a vehicle, premature adhesion is prevented, thus enabling the correct alignment of the PPF by an installer. Moreover, well, well-formulated slip solutions can also act as protective buffers between films and paints beneath them, hence reducing risks of damage during installations. The choice made on compatibility between this fluid and specific brands or types of PPFs may affect adhesion levels as good durability for them, which in turn guarantees seamless finish while extending the life span for the vehicle’s safeguarding against external factors.
What Are the Best PPF Installation Techniques?

Professional Paint Protection Film Tips
- Temperature regulation: Make sure the place of installation is within range with the suggested temperature which is often 60°F to 90°F degrees so that adhesion can be perfect.
- Preparation of surface: Clean the surface of the vehicle completely through washing so as to eliminate any dirt, oils, or waxes that may affect adhesion.
- Drying technique: Use compressed air or microfiber towels in drying up all water from this area and specifically in cracks.
- Film handling: Handle PPF using clean hands only and never touch the adhesive side for cleanliness should always be maintained.
- Stretching: Stretch gently without applying too much force so that shape distortion can be avoided during fitting, which ensures proper alignment.
- Heat gun application: Use the heat gun sparingly to enhance flexibility around complex curves and edges without overheating.
- Trimming: Trim film neatly along edges to prevent paintwork damage to the vehicle and improve its overall appearance during the installation process.
Using a Heat Gun for Wrapping Curved Surfaces
Knowing how to use a heat gun well is important when putting Paint Protection Film (PPF) on curved areas. This tool allows the installer to make the film more flexible so that it can be easily shaped around intricate designs. To get started, ensure that the heat gun is set at a low temperature as this will protect both the film and underlying paint from being damaged. Next, keep about 6 to 12 inches away from the surface consistently while sweeping back and forth with an even distribution of heated air. Apply gentle pressure along with stretching outwards over curves until excess material on top is positioned correctly without causing any folds or wrinkles beneath it where they shouldn’t be before noticing that one must watch closely during this step since different materials react differently when heated; hence modifying methods used based on such behavior exhibited by materials towards heat may be required sometimes. The right way of using a hot air blower not only improves fitting but also ensures that seams are invisible and guards against harm through PPF application.
Applying PPF on Complex Curves and Corners
A meticulous approach is necessary for achieving the best results when applying paint protection film (PPF) on complex curves and corners. First, choose a flexible and stretchable PPF of high quality. Prepare before application by cleaning the surface thoroughly to remove any impurities that could hinder adhesion. Use a squeegee to get rid of air bubbles as you put the film in place and ensure it fits tightly around corners. For areas with sharp angles or curves, try using the “tack-and-stretch” technique; stick one side of the film onto the surface, gently pull it over the curve then anchor down the other side while allowing gradual conformity.
Moreover, better conformance around sharp angles can be achieved by the use of a heat gun. Heat up the film slightly as it is manipulated around a corner, which will increase its flexibility. Trim any excess film near edges carefully using a sharp blade so as to create neat lines, but be careful not to damage underlying paintwork. Lastly, let installation cure well depending on weather conditions and the manufacturer’s instructions for durable protection and aesthetic appeal.
What Additional Tools Can Improve Your PPF Installation Process?

Top 5 Magnetic Wrapping Tools
- Magnetic Tool Holder: Assists in making work easier and reduce disorganizing during fixing so as to speed up the process of making them sleek.
- Magnetic Squeegee: It enables the application of even pressure for the film without it being scratched hence ensuring that a smooth finish is achieved.
- Magnetic Gloves: This will help you hold firm onto the film without any slippage which ensures that there will be accuracy and control of your application.
- Magnetic Cutting Mat: This mat acts as a barrier when cutting PPF thereby protecting damage on both the film and other surfaces underneath.
- Magnetic Alignment Tools: Facilitates accurate positioning of films before adhesion so that they are perfectly aligned.
Benefits of Using a Trim and Emblem Removal Tool
A number of benefits can be had from using a trim and emblem removal tool during paint protection film (PPF) installation. The first among them is that these tools help to ensure that the risk of damaging the paint when removing vehicle emblems or trim pieces is kept as low as possible, this being very important in maintaining the integrity of the underlying surface. They make it easy for one to remove them with precision and control without applying too much force which may cause scratches or dents to occur. Another positive point about these tools is that they enable quick access to areas that could complicate the application process if left uncovered, thus speeding up installation time greatly. By making emblem removal easier, they streamline workflow, resulting in better overall quality and finish of PPF installation work done.
Advantages of Having a PPF Tool Pouch
There are various benefits of having a Paint Protection Film (PPF) tool bag for installers. First, it helps in arranging and making tools easy to reach so that one does not have to spend much time looking for them during installation. This saves time hence improving workflow efficiency. Second, safety is enhanced when these sharp objects are kept safe from any danger; therefore using this type of bag ensures their protection. Additionally, this prevents tools from being damaged because they will be placed in one place all the time which extends their life span even more. Last but not least, an ergonomic design PPF Tool Bag can help reduce physical stress on workers’ bodies while also providing comfort throughout the working process.
Reference Sources
Frequently Asked Questions (FAQs)
Q: What are the tools required to install paint protection film perfectly?
A: Some tools for paint protection film include a ppf squeegee, edge squeegee, prep squeegee, wrapping tool kit, scraper, torch, and applicator to ensure an effective and smooth installation.
Q: How can I ensure the window tint sticks well without any bubbles?
A: To ensure proper adhesion of window tint it is important to remove all bubbles while applying by using a squeegee for ppf. Additionally, you can use a prep squeegee, which prepares the surface for better adhesion.
Q: What types of squeegees are recommended for installing paint protection film?
A: The installation squeegee is used to apply larger areas, while edge squeegees are designed to work on detailed edges. The pink squeegee best suits delicate areas and finishes during paint protection film (ppf) installations.
Q: Can vinyl wrap and window tint be done with similar tools?
A: Yes, vinyl wrap and window tinting can be applied using the same tools, such as felt edge applicators, and scrapers, among others, included in most kits for both applications.
Q: What does a torch do during the PPF installation process?
A: The torch heats up or softens the PPF so that it stretches easily around curves or complex shapes, enabling tight fitment. It also ensures smoothness and professionalism in finishing.
Q: How do I prevent paint scratching while applying paint protection film?
A: To avoid scratching the paint, apply the film with tools that have soft rubber edges, like suede-covered squeegees, and always make sure you lubricate the surface with a mist sprayer.
Q: What is a prep squeegee used for during the installation of paint protection film?
A: A prep squeegee is important because it is what we use to clean and prepare the surface by removing dirt, debris, and previous adhesives. This step ensures there are no imperfections when sticking on PPF.
Q: Are there any tools needed specifically for wrapping PPF around a curved windshield?
A: Yes, flexible squeegee for ppf; torch for heating/stretching film; pink squeegee for ppf in delicate areas – these will enable one to achieve a smooth finish on such surfaces.
Q: How do magnets help in installing films onto cars?
A: Magnets hold the film in place during initial positioning. They ensure exact alignment without using adhesives, making adjustments easier and more precise.
Q: What should a professional toolset include for installing automotive clear bra kits?
A: Various types of squeegees: sprayers/scrapers/torch/magnets/syringes (for getting rid of air bubbles)/tools made from stainless steel (for durability) – this allows for versatility during any installation project.
