DIY PPF Installation: How to Protect and Enhance Your Vehicle's Finish with Paint Protection Film
At the moment, when people are most concerned with how their car looks and how long it will last, they commonly use a product known as Paint Protection Film (PPF) to preserve their vehicle’s value. This article focuses on teaching readers about the do-it-yourself installation process of PPF, giving them technical understanding and step-by-step instructions for bettering the finish on their cars. We’re going to talk about choosing films rightly through effective application methods, so be sure that we cover everything necessary for an easy installation, regardless of you’re someone who knows a lot about automobiles or just starting out wanting some tips on protecting your ride, this guide should help you get professional results from home.
What is Paint Protection Film?

Understanding PPF and Its Benefits
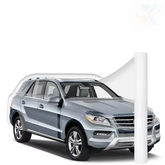
Paint Protection Film (PPF) is a clear, durable polyurethane film applied to an automobile’s surface to protect it from outside damage. Vital merits of PPF encompass:
- Scratch Resistance: In its turn, PPF acts like a barrier against minor scraping and blemishes that come with daily usage.
- UV Protection: Therefore, the paint below remains protected from dangerous ultraviolet rays, thus preventing blotchiness over time.
- Self-Healing Properties: Most of these kinds are made in such a way that they can heal themselves when heated, making small scratches and swirls go away.
- Chemical Resistance: Furthermore, PPF does not dissolve in some substances, such as bird excreta and road salts, which damage paint.
- Enhanced Aesthetics: Additionally, it enhances the look of a vehicle by giving out a high-gloss finish.
In essence, therefore, PPF represents an efficient means for preserving both the aesthetical and structural integrity of a car’s finishing while guaranteeing the ultimate protection throughout.
Different Types of PPF: Precut, Full Front, and Full Car
When considering installing Paint Protection Film (PPF), there are different choices available that are designed for various coverage levels and installation difficulties:
- Pre-Cut PPF: It is comprised of film pieces that have been pre-cut to fit certain makes and models of vehicles. The process of applying it is made easier through this technology, as the installer does not have to measure or cut the film during installation. Pre-cut kits usually cover parts that are prone to high impact, like fenders, hoods, and mirrors.
- Full Front PPF: This type of film covers the entire frontal part of a vehicle including the bumper, fenders, headlights, and hood. This option offers full protection against insects, debris from roads and other potential damages which makes it suitable for drivers who frequently drive long distances or tough terrains.
- Full Car PPF: To achieve maximum protection, one can opt for full car PPF, whereby films are mounted on the whole outer surface. This choice provides unequaled defense against scrapes, UV rays, and elements such as dust particles, thus keeping the car’s look intact and its value high. It is ideal for those who want to maintain a flawless finish or for expensive automobiles that need more attention.
The level of protection required by a vehicle owner can be balanced with their budget and aesthetical considerations by each option.
Common Brands of PPF: Xpel, Suntek, and Stek
When talking about high-quality Paint Protection Film (PPF), Xpel, Suntek and Stek come top.
- Xpel is known for its technological advancement which include a self-repairing surface that can fix small scratches and swirl marks through heat. The Ultimate Plus film by Xpel has superior clarity and durability ensuring that the protection lasts long without affecting the look of the car.
- Suntek, on the other hand, is famous for being affordable yet highly effective. It does not turn yellow easily; it also provides strong UV ray blockage as well as chemical contamination prevention in the form of their Ultra product line. Many people love this brand because they offer good quality PPFs at lower prices, which suits individuals with tight budgets but who need reliable solutions.
- Stek has built its name around innovation and premium standards, too. Their DynoShield series boasts an advanced hydrophobicity feature, as well as the ability to heal itself while repelling water drops and dust particles concurrently. Most customers are impressed by how clear Stek films are and by the fact that they blend seamlessly with any surface applied to them.
Ultimately, these three brands give different choices so that motorists can select one according to what they think will work best for them considering various factors such as personal requirements or desires related to PPF installation in particular situations.
Why Choose DIY PPF for Your Tesla?

Advantages of DIY PPF
- The cost-effective option: It is a cheap way of installing the DIY but eliminates labor costs that are charged by professional services for vehicle owners.
- Flexibility: This allows vehicle owners to choose when they want it installed so that they will not be inconvenienced.
- Customization: PPF with do-it-yourself options allows for customization in terms of how the product will be applied depending on the preferences and specific areas of concentration on the car.
- Learning Experience: The knowledge acquired when one undertakes this can help him/her grasp more about PPF technology and how to maintain their car.
- Quality Control: It guarantees individuals that after installation, they have observed keenly enough to get a superior finish.
Cost-Saving Benefits
DIY PPF installation primarily saves money through the drastic cutting down of costs in general. The owners of cars can prevent paying professional labor charges by installing themselves as these rates may differ widely from one store to another and depend on how difficult a task is. Moreover, buying PPF materials directly often comes out cheaper compared with going for packages that are bundled professionally. Another thing is that using internet-based tutorials and resources may smoothen beginners’ understanding curves thereby lowering risks connected with wrong decisions that may be costly. All in all, such elements make up for substantial financial benefits to those ready to sacrifice their time and sweat towards any self-help scheme.
Customization Options for Tesla Model 3 and Model Y
In terms of customizing the Tesla Model 3 and Model Y, there are many options for owners to choose from which can enhance both the looks and functionality of their cars. Some of these customization options include:
- Paint Protection Film (PPF): PPF kits designed specifically for the Model 3 and Model Y are available in different brands that cover high-impact areas like side mirrors and front bumper, etc. Pre-cut kits by XPEL or 3M save time on fitting while giving a more finished look.
- Ceramic Coatings: It’s an option which gives extra strong shield against scratches, contaminations, and UV rays. Products made by companies such as Gtechniq or CarPro have been known for their long-lasting nature as well as keeping that glossy finish alive!
- Interior Upgrades: This involves changing things inside, such as floor mats, seat covers, dashboard wraps, ambient lighting, etc.; all these things contribute greatly towards making the driving experience better. There’re various manufacturers who offer custom fits to match materials with Tesla’s sleek design.
- Wheels & Tires: Getting larger wheels or opting for aftermarket designs can make your Model three look more appealing visually and improve its performance. Brands like Vossen or HRE provide multiple choices catering specifically to this particular line-up.
- Software Customizations: Performance upgrades and infotainment system aesthetic changes are some software-level modifications that a Tesla owner can make. The use of third-party apps also helps expand the functionalities of a vehicle.
By taking advantage of these ideas, any individual possessing a Tesla Model Three, why not create personal transportation devices that reflect their preferences in style and practicality?
How to Prepare Your Car for PPF Installation?

Cleaning and Paint Prep: Using Clay Bar and Paint Correction
To ensure your vehicle gets ready for paint protection film (PPF) installation, start by thoroughly washing it to eliminate any dirt or debris on the surface. After washing, use a clay bar to remove contaminants embedded in the paint that may not be addressed by regular washing. This step helps smoothen out the paint surface and promotes better adhesion of PPF. In addition, if there are noticeable swirl marks or scratches on the car’s bodywork, you might want to consider doing some paint correction as well. This will bring back clarity and depth into the color, which ultimately enhances how effectively PPF is applied to it. With careful cleaning and necessary corrections made on paints; one sets up a strong foundation for successful installations of PPFs.
Tools You Will Need: Squeegee, Heat Gun, and Tack Solution
- Squeegee: You need a good squeegee to put on PPF smoothly and get rid of bubbles. Make sure the squeegee has a solid, but flexible blade so it can distribute pressure well without hurting the film. Generally, a 3 or 4-inch wide one will do for most installs because it covers more film at once.
- Heat Gun: Heating is what lets you mold PPF around curves and edges when installing. Look for heat guns that have adjustable temperature settings from about 100°F to 500°F (38°C to 260°C) so you can avoid overcooking the film. Applying heat right helps expand and contract the material which tightens up fitment and makes it last longer.
- Tack Solution: Tacking solution acts as a lubricant between both surfaces that are being worked with – in this case; ppf & vehicle’s exterior paintwork. This allows repositioning without alignment issues, as they may occur if adhesion was made permanent during the placement process alone. The commonly recommended mix would be a half-half ratio by volume of isopropyl alcohol to distilled water since it provides enough stickiness while drying up fast and avoiding water spots or residues.
It is important to have the correct tools available during installation to achieve professional results with Paint Protection Film (PPF). They not only help in making the procedure easier but also contribute greatly towards its final outcome.
Ensuring the Surface is Fully Dry and Dust-Free
For Paint Protection Film (PPF) to adhere well and function as needed, remember to clean the surface on which it will be applied. The area should be free of dust or any contaminant, while dryness should be maintained at all times. Cleaning may start with a thorough vehicle wash using appropriate detergents that remove dirt, grease, and even old wax. After washing, ensure drying is done properly until no water spots are left behind, as they can interfere with sticking; microfiber towels can be used in drying the surface. In addition to this, it is recommended that you give some time for air drying, especially around corners where trapped moisture could still exist.
After being dried off completely, inspect carefully the entire painted section, looking for any signs of lint or foreign objects that need eliminating before proceeding further. A good way to go about this is wiping down the area with a soft, clean microfiber towel followed by either compressed air or tack cloth, which helps to pick up remaining dust particles. This level of attention ensures that once installed, PPF stays long-lasting and visually clear by providing an ideal base for adhesion through meticulous preparation.
Step-by-Step Guide to DIY PPF Installation

Precut PPF vs Full Wrap: What to Choose?
When choosing between precut PPF and a full wrap, these are the things you should consider.
- Completeness: A full wrap covers the whole surface of your car while precut PPF targets some areas only, which means that it uses fewer materials at times.
- Ease of installation: In general, kits that have been pre-cut are easier and quicker to install making them good for do-it-yourself projects. On the other hand, achieving a seamless finish with full wraps requires more expertise or skill.
- Cost: Compared to labor and material costs incurred by full wraps; using less material makes pre-cut PPFs cheaper.
- Personalization options: When it comes down customizations or design possibilities there really isn’t any limit as far as what can be done during an entire vehicle coverage; but with pattern restrictions inherent in pre-cut ppfs this might not always apply.
Ultimately, though, budget constraints, desired protection levels, and install complexities will always determine which one works best for you.
Applying PPF to the Front Bumper and Fender
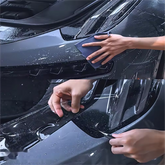
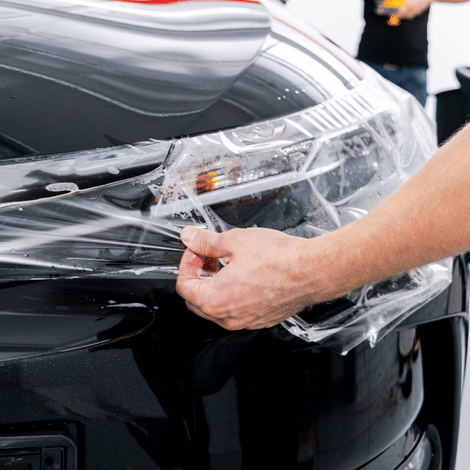
To begin the installation on the front bumper and fender with PPF, first, you want to clean the surfaces very well and make sure they are free from any contaminants. Then, measure the PPF material so that it fits properly, lining up with body lines and curves as necessary. Start at one edge of either piece (Bumper/Fender), gradually squeegeeing it down while pushing out air bubbles. Use a heat gun if needed to form around corners/edges and make sure everything goes on flat. Trim off any extra film at this point if desired for a cleaner look; otherwise, let dry according to package instructions.
Edge Wrapping Techniques for a Seamless Finish
Edge wrapping is an important aspect of paint protection film (PPF) installation as it helps to prevent lifting and peeling at the edges which in turn ensures durability and visual appeal. In order to achieve a continuous finish, do the following:
- Preparation: Thoroughly clean and dry the surface. This will make sure that PPF sticks well with vehicle surface thereby enhancing adhesion over a longer period.
- Film Overlap: While fixing PPF, let it slightly extend past panel edges so as to fully cover them too; this reduces chances of visible seams or even damage from outside.
- Heat Application: Use a heat gun when wrapping corners/curves around PPF. It warms up film, making it soft enough for easy conformity into any shape, especially those having tight radii such as bumpers; additionally, heating also seals off its wraps onto surfaces, thus giving a cleaner/professional look, mainly through enhanced edge closure.
- Squeegee Usage: Employing a squeegee that is suitable for use by professionals ensures equal distribution of pressure during application while pushing out air bubbles that might have been trapped beneath, thus making sure there are no creases left behind after finishing touches have been done on the topmost layer/skin of paint protection films.
- Trimming: Trim excess parts only after successfully wrapping around all necessary areas, but be cautious not to damage other parts. Use a sharp blade and follow the vehicle’s contours closely so as not to leave rough patches along the edges where they were cut short, leading to a rippled appearance. instead, a smooth finish would have covered the entire surface evenly without leaving behind any wrinkles or unevenness on the painted part.
These techniques enable installers gain expertise needed to increase performance levels as well lifespan of PPFs hence achieving a flawless finish which stays attractive forever.
Common Challenges and How to Overcome Them

Avoiding Bubbles and Wrinkles During Installation
In order to prevent the occurrence of bubbles and wrinkles during application of PPF, observe the following procedures:
- Perfect Alignment: Position the film correctly before sticking it on surfaces, thus enabling adjustments that avert wrong placement.
- Controlled Pressure: Apply equal force throughout the film by means of a rubber scraper while focusing on pushing from one side towards another’s center in order to avoid having air spaces.
- Temperature Regulation: Keep constant temperature in installation area and heat up slightly the film before applying it so that flexibility is enhanced.
- Gradual Application: Put on the film sectionally as you slowly remove its backing and apply so as not to trap air under it.
- Smooth Technique: Instead of poking motion which may lead to folds and bubbles, employ a scraping way using a squeegee that goes smoothly all over.
If you adhere to these strategies, your installation process will be easier and cause a professional finish.
Handling Complex Areas like Headlights and Door Handles
Seamless application of Paint Protection Film (PPF) on such areas as headlights and door handles is only possible if they are handled with extra care during installation. Below are some useful tips:
- Use Pre-cut Templates: The templates should be specifically designed for complex shapes. This will guarantee complete coverage while minimizing unnecessary wastage that might cause installation problems.
- Trim Precisely: For places where full panels cannot fit, trim the film expertly so that it matches perfectly. A sharp blade should be used to avoid leaving behind rough edges which can still destroy the car’s surface.
- Apply Heat: Before mounting PPF on intricate contours, warm it up slightly using a heat gun. Doing this increases flexibility of the material hence enabling it to take different shapes around curved surfaces as well as tight spots easily.
- Layering Technique: In certain cases, like those of door handles, one may need to use smaller pieces of film and then overlap them slightly. However, ensure that each piece sticks firmly on top of another; otherwise, they might start peeling off later.
- Pay Attention to Details: Concentrate more on smoothing out these films around fine points and check regularly whether they have stuck properly or not since any air left inside will always lead to lifting with time thus forming bubbles.
The above practices enable installers to overcome challenges posed by complexity in design, thus giving maximum protection provided by PPF while still maintaining a good appearance.
Troubleshooting Installation Issues: When to Seek Professional Help
Knowing the right time to ask for professional assistance while applying Paint Protection Film (PPF) is important so that you get the best results. Here are some situations when one might need professional help:
- Extreme Damage or Contamination: If there are deep scratches, dents or contamination noticed on the vehicle’s surface before it is wrapped, professionals will be able to evaluate and prepare such a surface in order to achieve success during application.
- Recurrent Bubbles or Wrinkles: When installing PPF, if you come across bubbles or wrinkles that keep reappearing even after using normal techniques to smoothen them out, this might indicate wrong handling or installation conditions, which should be addressed by someone with expertise.
- Lack of Skill with Complicated Shapes: Some complex geometries or high-end cars may pose unique challenges that require specific knowledge about them or special skills; therefore, it would be advisable to consult an experienced installer who knows how to handle such cases.
- Adhesion Problems: If you realize that the film is not sticking as expected, like when it starts lifting from some areas or peeling off altogether at certain edges, this could imply underlying problems related to application conditions—for instance, temperature and moisture—which can only be fixed by a professional.
These signs will help individuals know when to seek professional installation services to ensure the durability and efficiency of PPF.
Maintaining Your PPF Wrapped Vehicle

Regular Cleaning and Maintenance Tips
For effective maintenance of your vehicle wrapped with Paint Protection Film (PPF), follow these brief hints:
- Washing Frequency: Clean the car consistently but not more than twice a month to avoid the accumulation of dirt.
- Cleaning Products: Use pH-neutral car washes to prevent damage to the film. Avoid using harsh chemicals or solvents.
- Drying Method: Ensure that the drying is done gently using a microfiber towel so as to avoid swirl marks. Air drying is also safe for use.
- Use of Wax and Sealants: Apply PPF-compatible wax or sealers to improve shine and protect against UV rays.
- Avoid Abrasive Tools: Avoid using abrasive sponges or brushes which may scratch the film surface when cleaning it.
- Bird Droppings and Contaminants: Deal with bird droppings, tree sap or contaminants promptly, otherwise they may cause harm.
- Temperature Considerations: Never wash your vehicle during direct sunlight or extreme temperatures as this will affect adhesive integrity.
By following these maintenance tips you can maintain the cosmetic value and efficiency of PPF.
Benefits of Ceramic Coating Over PPF
Advantages of Ceramic Coatings over Paint Protection Film (PPF) in terms of vehicle protection and appearance.
- Chemical Resistance: Ceramic coatings are more resistant to harsh chemicals, road salts and other environmental contaminants that can etch or corrode the vehicle’s paint.
- Hydrophobicity: The hydrophobic properties inherent within all ceramics cause water to bead up and roll off easily, preventing dirt from sticking onto the surface thereby facilitating cleaning processes.
- UV Protection: Enhanced UV protection is provided by these coatings such that oxidation does not occur neither does the underlying paint fade hence prolonging the life span of any car finish.
- Glossiness Accentuation: Ceramic coatings enrich gloss and depth in a vehicle’s paintwork after they are applied, giving it an attractive, high-luster appearance that matches its aesthetic appeal.
- Long Lastingness: A properly maintained ceramic coating may last for many years, unlike PPFs, which need replacement after certain periods of time.
- Resistance to Scratches: While none can be said to be absolutely scratch-proof, light scratches are less likely to occur on surfaces coated with ceramics than those with PPF, keeping them looking new always.
Ultimately, both serve protectant purposes; however, considering longevity alone together with other additional merits would make one realize how much better suited this form should be incorporated into various car care strategies.
When to Replace or Repair Your PPF
It is important to know when to replace or repair Paint Protection Film (PPF) in order to maintain maximum vehicle protection. Generally, these are the signs that it’s time for a replacement:
- Noticeable Yellowing or Discoloration: As PPF ages, it can degrade and lose clarity; this often results in an unattractive yellow hue that takes away from the car’s aesthetic appeal.
- Peeling or Lifting: When film edges start coming up from the surface they were adhered to, it may allow contaminants underneath which compromise its protective abilities. Sometimes minor lifts can be fixed but extensive ones usually mean new install is necessary.
- Cracks or Scratches: While scratch resistant qualities are part of what makes PPF so valuable as an addition atop automotive finishes, deep scratches or cracks could occur that cannot be mended. If damage covers large areas repeatedly throughout then replacement should be considered standard procedure.
Routine care, such as cleaning and inspection, will help extend the life of your PPF while ensuring continued efficacy in protection. For comprehensive assessments leading to informed choices about fixing versus swapping out materials, consult with professional installers.
Reference Sources
Frequently Asked Questions (FAQs)
Q: What is paint defense film (PPF), and why should I mount it on my cars and trucks?
A: Paint Security Movie (PPF) is a transparent or matte film applied to an automobile’s paint to safeguard it from scrapes, chips, and other damage. Installing PPF aids in maintaining your car’s surface, making it look new for longer and potentially raising its resale worth. Do It Yourself PPF installment can save you cash and provide a feeling of achievement.
Q: Exactly how difficult is it to DIY a PPF install?
A: The problem of DIY PPF installation can range from easy to hard, depending upon your experience degree and the complexity of your car’s surface areas. It takes persistence, attention to information, and a steady hand. While someone without any experience might find it really tough, those with some background in vehicle outlining or wrapping must be able to handle it with enough methods.
Q: What devices and products do I need to set up a Do It Yourself PPF?
A: For a DIY PPF setup you will require a couple of fundamental tools like blade cutters/knives (with spare blades), squeegees (soft/rigid), warmth guns/hair dryers (or various other sources of warm), squirt bottles/spray containers, measuring tape/rulers/straight edges, etc., lint-free towels/cloths/paper towels for cleansing & drying out surfaces before applying movie– these are simply several of the things that may be needed – consult guidelines supplied by supplier! Many more professional packages, such as those provided by Tebros, consist of all-in-one kits, simplifying the process!
Q: Should I choose matte or clear PPF?
A: Whether you choose matte or clear film depends upon what sort of look you want for your auto. Matte offers an extra distinct non-reflective coating that can truly make any kind of vehicle stand out from the group! Transparent keeps the initial gloss and color of your paintwork undamaged, so this is the best fit if you want to maintain that factory finish.
Q: Can I cover my whole auto in PPF myself?
A: Covering entire vehicles in PPF is a big job that could take over 50 hours for someone who has never attempted it. It requires a lot of precision and perseverance – if you’re after excellence yet do not have much experience after that, maybe start with smaller-sized locations such as edges around front fenders or side skirts. These are great locations to obtain some technique in before moving onto other parts!
Q: Does DIY PPF installation last as long as a professional job?
A: A DIY PPF application done properly can last for a very long time but may not achieve the same level of perfection that professionals do. Professionals have been in the business for years and use more advanced equipment to ensure that no air bubbles or creases mar the film. Nevertheless, most hobbyists are happy with their results, and it works great for them.
Q: What if my PPF gets scratched or damaged?
A: If your paint protection film gets scratched up or damaged in any way, shape, or form, take it off! To replace it is as simple as carefully peeling back one corner of the damaged area before removing the rest until every inch has been replaced by fresh adhesive wrap – be sure not to skip any section else that might affect your car’s finish.
Q: Will applying PPF cause problems with my car’s paint job?
A: No, when applied correctly, PPF should not cause any issues with your car's finish at all; moreover, it is designed to be safely put on and taken off without affecting the underlying paint. However, if stretched too much during installation or left with air pockets beneath (bubbles), this can lead to difficulties, so make sure to follow the directions included in the kit.
Q: Can I put PPF on my secondary vehicle before doing my main car as practice?
A: Yes! But only after practicing first-hand knowledge from working on another surface—specifically, being able to see how different types react when subjected to similar conditions—before moving onto something more valuable, such as your primary ride; thus, you acquire the necessary skills beforehand while also gaining some much-needed confidence along the way.
