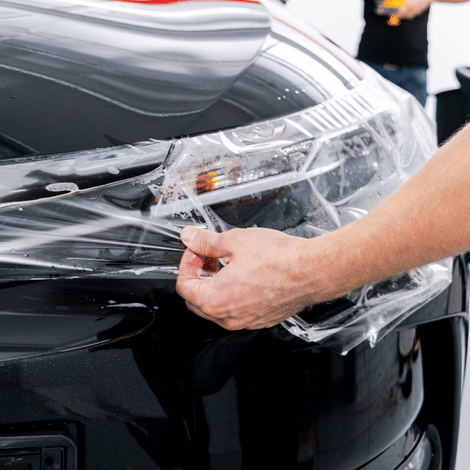
How to Install Paint Protection Film: Step-by-Step Guide for Professional Results
In the automobile sector, it is vital to preserve the finish of a vehicle not only for its beauty but also for its resale value. Paint protection film (PPF) is an inventive method that protects cars from scratches, chips, and contaminants brought about by the environment. In this article, we will discuss step-by-step instructions on how you can effectively install paint protection film (PPF) and achieve professional results. Even beginners can follow these steps closely and have their car’s paint looking better than ever with such an invisible shield against damage provided by PPF! This comprehensive guide covers everything from what tools are required through exact application methods, so be sure to read through all sections before starting work on your own vehicle – trust me when I say knowledge is power here!
What is Paint Protection Film (PPF), and Why Do You Need It?

Understanding Paint Protection Film (PPF)
Paint Protection Film (PPF) refers to a thermoplastic urethane film that is installed on the exterior surfaces of an automobile. It aims at protecting the paint from physical damages, including chips, scratches, and wearing off due to road debris and chemical contaminants together with UV rays as environmental hazards. When it comes into contact with these elements, PPF acts as a see-through guard, which does not change how the original coat of paint looks underneath, thus keeping up with its aesthetic appeal and resale value. In addition, this product has self-repairing abilities, which make small cuts or scrapes disappear over time, thereby making them more durable and efficient in their function.
Benefits of Installing Paint Protection Film
Putting Paint Protection Film (PPF) on your car has a lot of benefits for the look and life span of the paint. To start with, it is a good shield against everyday dangers like road debris, rocks, or bug splatters, which greatly reduce the chances of getting any paint chips or scratches. Secondly, its protection from UV rays makes sure that paints don’t fade, keeping them bright throughout the years in the future. PPF is designed to resist different types of chemicals, including strong cleansers and bird droppings, thus making it easier for someone to clean up their car’s exterior parts regularly.PPF can heal itself slightly when exposed under hot conditions hence maintaining clearness over some small scratches while guarding against damages beneath such as those caused by stones etcetera. Finally, yet importantly self, healing abilities mean that even if there are minor scuffs, they will disappear after being subjected to heat, thereby preserving overall clarity as well as protecting underlying coats. In general, PP films not only secure but also increase resale value by maintaining a perfect state of vehicle finishes.
Types of PPF and Their Functions
Paint Protection Film (PPF) has several types designed to meet specific needs and preferences. There are three main types of PPF: self-healing film, matte finish film, and gloss finish film.
- Self-Healing Film: Self healing PPF is made with advanced polymers which enable it to heal small scratches and swirl marks overtime when subjected to heat i.e. either from the sun or warm water washing. It keeps clarity intact while blocking blemishes from becoming permanent.
- Matte Finish Film: Matte finish PPF offers a non-reflective surface that brings out the best in matte-finish cars’ appearance without gloss but still guards against environmental hazards, too. This kind of film proves more useful in keeping the originality of custom paint jobs with no shine.
- Gloss Finish Film: Glossy painted surfaces can benefit from gloss finish films, which not only deepen colors but also provide extra protection against chips, scratches, and UV ray damage. Many people prefer this choice because it works well with most vehicle paint types.
Each type of paint protection film is designed for different needs, ensuring that there’s always one that aligns better with personal goals for aesthetics and security among car owners.
How to Prepare Your Vehicle for PPF Installation

Cleaning the Car Paint Surface
In order to fix the vehicle for paint protection film (PPF) installation, it is important that the surface of the car’s paintwork be cleaned well so as to ensure proper adherence. Use a good pH-balanced auto shampoo to wash the whole car and remove any dirt and grime. Next, clay the surface to get rid of embedded contaminants such as tree sap and industrial fallout. Rinse off thoroughly then dry using a soft microfiber cloth in order not to leave any water marks behind. Finally, examine for faults in the paint, like scratches or swirl marks, which should be dealt with before applying PPF. Ensure a dust-free environment by cleaning up all dirt from where you are going to install PPF.
Using Installation Gel and Soap Solution
Once the paint surface has been prepared, an installation gel and soap solution should be used to make Paint Protection Film (PPF) easier to install. This serves many purposes such as lubricating it so that the film can be moved around during installation and preventing air bubbles from getting trapped underneath it. The mixture for this solution involves a few drops of mild automotive pH-neutral soap mixed with water in a spray bottle. Before placing PPF down generously mist both surfaces with this product; neither should be left dry if optimal results are desired during installation. Doing so ensures that there is enough coverage on both sides, thus enabling them to come together well without leaving any gaps or wrinkles behind, which may lead to imperfect finishes or even peeling off after some time.
Paint Correction Before PPF Application
To obtain optimal results when applying paint protection film (PPF), it is necessary to perform a paint correction. This typically involves a number of steps designed to eliminate imperfections that might hamper adhesion and spoil the look of the film, such as scratches, swirl marks, or oxidation. A multi-stage polishing system can be used by technicians to improve clarity and depth in automotive paints. They do so through successive use of products with differing abrasive levels, i.e., compound, polish, and finishing polish, which refine surfaces progressively. Once corrections are made, it’s important that one cleanses the paints properly so as to remove all residues left behind after polishing, thereby providing a clean surface over which PPF can be installed smoothly. This thorough method improves not only the beauty aspect but also increases life expectancy for PPF protection on vehicles.
What Are the Steps to Apply Paint Protection Film?

Cutting the Film to Fit Your Vehicle
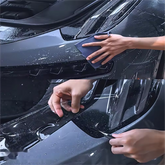
To ensure a perfect installation, it is necessary to cut the paint protection film (PPF) in such a way that it fits the unique curves of your car. Typically, this job starts with accurate measurement-taking of the surfaces which will be wrapped using specific gadgets like measuring tape and digital calipers among others. For hard-to-reach places, experts recommend making templates through computer-aided design software that shows details visually.
After getting measurements ready, you should put PPF on a flat surface, ideally clean, and remove part of its backing at once so as not to complicate things during handling. Then, using a professional vinyl cutter, which is preferable, cut out pieces according to already set dimensions, taking into account allowances for roundings, even unique vehicle features, if any.
Thicker films are better than thin ones; normally, they range from 6-8 mils, hence giving good strength but still being flexible enough not to break easily when flexed or stretched over sharp corners/edges. In addition, some extra material should be left behind since there might arise a need for adjustments during the installation process . Also, scoring along lines drawn with a pen can help achieve straight cuts, especially where accuracy matters most, thus avoiding wavy edges, which may negatively affect performance/appearance post-application due to air bubbles forming beneath them, causing delamination.
At this stage, after cutting has been done, it’s important that one checks for defects in the film, such as bubbles, creases, or scratches, before proceeding with applying it to car bodywork. This step-by-step approach gives an error-free finish and increases the overall extent of protection against harmful elements offered by these protective measures.
Wet Installation Method Using Slip Solution
The damp installment technique can be achieved using a slip solution, which is a combination of some water and a few drops of mild soap or application agent. During this process, the solution makes it easy for paint protection film (PPF) to be positioned by allowing it to slide temporarily. Start by spraying liberally with slip solution on both sides of the adhesive part of the film and where it will touch the car.
This creates an environment that is slippery enough to enable one to move the film around without damaging its stickiness properties. Once you have placed it correctly, use a squeegee in order not only to remove any excess moisture as well as air bubbles but also to ensure firm attachment between the surface and PPF. The remaining wetness shall disappear over time thereby enabling better curing through adhesion. This kind of method can work best for bigger sizes or shapes with many curves since it helps achieve smoothness during installation without bubbles.
Squeegeeing the Protective Film Without Air Bubbles
Squeegeeing is crucial when applying paint protection film (PPF) so that it appears uninterrupted and devoid of bubbles. First, choose a high-quality squeegee with a hard but pliable edge to effectively eliminate air and moisture without harming the film. Start at one side of the film and move horizontally across it, keeping your squeegee flat against the surface as you do so. It is recommended that you work with short strokes that overlap each other, starting from the middle and moving outward toward the edges; this helps drive any trapped air toward the sides where it can easily get out. If there are stubborn air bubbles, gently prick them with a small needle to let air escape then flatten down the film with a squeegee. Not only does this approach increase adhesion between films, but it also enhances finished installations’ visibility and durability. For best results ensure cleanliness as well as dryness on the surface being treated before application because doing this cuts off most causes of bubble formation during squeegeeing.
How to Ensure Longevity and Durability of PPF?

Maintaining the PPF Film for Best Results
To ensure the longevity and durability of paint protection film (PPF), adhere to the following best practices:
- Regular Cleaning: Always use pH-neutral non-acidic car wash shampoos and soft microfiber cloths to clean the surface consistently. Avoid any abrasive materials that may scratch the film.
- Avoid Harsh Chemicals: Do not use solvent-based cleaners or strong chemicals that can destroy PPF’s adhesive properties.
- Waxing: Apply a wax or sealant specially made for PPF to improve its shine and enhance another layer of defense from harmful UV rays, dirt, or grime.
- Avoid High Heat: Avoid parking under direct sunlight, especially for an extended period, as this can make your film warp or be damaged otherwise.
- Regular Inspections: Always check your film for any signs of wear or damage. Fixing such problems immediately will help prevent further deterioration.
These instructions will help maintain the PPF so that it functions optimally and looks good over time.
Regular Cleaning and Maintenance Tips
For the maintenance and preservation of a paint protection film (PPF) to ensure its perfect state, here are some tips in brief:
- Twice Every Week Wash: Clean the film using pH-neutral soap and a soft sponge twice a week. This will help prevent the accumulation of dirt.
- Thorough Drying: It is important to dry off all surfaces completely using a microfiber towel so as not to leave behind any water spots.
- Non-Abrasive Wax: Apply non-abrasive wax made for PPF every three-six months. It should serve two purposes: safeguarding from UV ray damage as well as giving it more shine.
- Avoid High-Pressure Washing: When washing, use low pressure so as not to dislodge the edges, which may result in lifting.
- Immediate Contaminants Removal: In case things like bird droppings or tree sap occur on it, clean them off straight away with suitable cleaning agents otherwise they might cause etching/staining.
By following these care routines you will be able to extend lifespan of your PPF while maintaining its appealing look.
Protection Against Rock Chips and Tree Sap
Applying paint protection film (PPF) is one of the most effective ways to prevent your car’s paint from being damaged by rock chips and tree sap. PPF acts as a strong shield that can absorb damage caused by debris while resisting chemical stains that could harm the finish of your vehicle. However, it is important to act quickly in removing any tree sap since both the film itself and the underlying paint may suffer permanent damage if left for long.
Furthermore, taking regular care, such as cleaning affected areas with non-corrosive solutions, will help lower the risks associated with these pollutants. It is also advisable for motorists to park their cars under cover or shade whenever possible so as to reduce exposure to falling sap from trees; additionally, they should be cautious when driving off-road or on gravel roads, which tend to increase chances of getting hit by stones. If all these precautions are observed alongside the installation of PPFs, then the durability and appearance of cars can greatly be improved.
Should You Choose Professional PPF Installation?

Pros and Cons of DIY vs. Professional Installation
Do-it-yourself installation
Pros:
- Inexpensive; cuts down on wages of workers.
- Opportunity to install during your free time.
- Ability to manage the installation process and the materials used.
Cons:
- Requires some skill and experience for accurate use.
- Higher chances of poor alignment or air pockets, thus affecting effectiveness.
- If not correctly installed, it may ruin a vehicle’s paintwork.
Professional installation
Pros:
- The specialist input guarantees that the fitting is invisible and exact so that protection is maximized.
- Access to professional materials and tools which may not be available to DIY enthusiasts.
- Workmanship warranty or guarantee to provide additional peace of mind.
Cons:
- More expensive upfront due to labor charges and service fees.
- Installation procedure becomes less manageable in terms of control and timing.
- Reliance on professional services availability.
What to Look for in a Professional PPF Installer
In order to ensure high-quality results and the best possible protection for your car, there are a few things you need to keep in mind when choosing a professional PPF installer. First and foremost, they should make sure that they have experience applying paint protection films (PPF). Look at their portfolio for past projects – this will help you understand how good their work is and how much attention to detail they pay. Also, it would be wise to check if they have any certificates from reputable manufacturers of PPF. This means that such specialists are trained professionals who follow the industry's standards.
Then ask what kind of materials these people use because good-quality film provides not only durability but also effectiveness. Moreover, try finding testimonials or reviews left by other customers so you could learn about the overall satisfaction level among them and possible problems faced while dealing with chosen installers. Last but not least – should something go wrong during the installation or afterward – both parts (materials/work) must be covered by a warranty which has clear terms & conditions protecting against defects as well as mistakes made by staff members themselves. Think about all these points before making up your mind on selecting one particular specialist over another!
How Much Does Professional PPF Installation Cost?
Several things can drive the amount of money one has to pay for professional paint protection film (PPF) installation. Among these are geographical location, vehicle make or model, and how complicated the process is. Generally, customers should be ready to spend any amount ranging between $1,500 and $7,000 on a full-body install. Partial installations that cover only certain parts like hoods or front bumpers usually cost anywhere from 500 bucks to 2000 dollars.
Prices may also go higher depending on the luxuriousness of the films used as well as wider coverage areas or intricate designs required by some vehicles. It is important to note that an installer could have packaged deals or give discounts when more than one car is being done at once; this would save costs significantly. In conclusion, it’s advisable that you ask around lest you find yourself overcharged because different installers might have their reasons why they charge what they do.
Reference Sources
Frequently Asked Questions (FAQs)
Q: What are the benefits of installing PPF on a new car?
A: Applying PPF to a new car has numerous benefits, such as shielding it from rock chips, scratches, and contaminants. It also keeps the vehicle's paint in tip-top condition while guarding the clear coat below the PPF.
Q: How should I get my vehicle ready for PPF installation?
A: Getting your vehicle ready for PPF installation requires washing it thoroughly to remove all dirt and grime and drying it properly. You can also use an alcohol solution to get rid of any remaining grease or contaminants. Having a clean surface is very important because it allows the film to stick well.
Q: Can I install paint protection film myself, or do I need a professional?
A: Although detailed guides and tutorials may help you learn how to install paint protection film yourself, hiring a professional installer is highly recommended to achieve better results. Professional installers have the skills, experience, and tools needed for faultless application.
Q: What tools do I need to apply paint protection film?
A: Some of the necessary tools for installing paint protection film include a heat gun, squeegee, spray bottle with soap solution, cleaner used to prepare surfaces, and sharp blade or knife for trimming excess films. These help ensure smooth application without damaging paint.
Q: How do I stretch the film properly during installation?
A: To stretch the film properly, slightly warm it using a heat gun, increasing its flexibility. During this process, ensure that no air bubbles or wrinkles are left behind after stretching and applying your films carefully. This stage is essential because it eliminates any form of painting damage while giving a seamless finish.
Q: Can you put PPF over ceramic coating?
A: Yes, it is possible to apply PPF over a ceramic coating. However, it should be ensured that the ceramic coating has completely cured before commencing paint protection film installation. This combination gives extra protection for your car's paintwork.
Q: What must I do to my car after installing PPF?
A: After installing PPF, avoid washing your car within 48 hours to let the adhesive bond fully. Use gentle washing methods and avoid abrasive cleaning tools. Regular maintenance will keep both the ppf and your vehicle’s paint in good condition.
Q: What if I see bubbles or imperfections after putting on PPF?
A: If bubbles or imperfections are noticed, warm that area gently using a heat gun and then use a squeegee to smooth out bubbles by applying light pressure from the center towards the edges until they disappear. Be careful not to overheat nor damage the film during this process. If problems persist, consult with an experienced installer.
Q: Are there any differences between clear ppf and colored ppf?
A: Clear ppf is see-through; therefore, it does not change anything about how your car looks apart from protecting its original paintwork, while colored ones modify appearances but still offer equal levels of protection against scratches, etcetera. Both options are capable of safeguarding vehicles for long periods also enhancing their aesthetic appeal.
Q: How frequently should I check the PPF for damages or wear signs?
A: It is advisable that you inspect ppf every couple of months so as not to miss any signs indicating the need for replacement due to damage caused by natural wear and tear factors, which could result in failure to provide continuous shield over automotive finishes, thus preserving their integrity forever.
